





Realistic instruments with multiple velocity layers
Many soundfonts play a single sample per note: whatever the force with which a key is struck, the same recording is heard, only louder or softer. Acoustic instruments don't behave this way. A piano key struck softly gives a round and mellow sound, while the same key struck hard gives a brighter sound, richer in harmonics, with a more percussive attack.
Velocity layers bring this richness to a soundfont: each note is recorded at several dynamics, and the recording that is played is chosen according to the velocity of the note. This tutorial takes the piano as an example, but the method applies to every instrument whose timbre changes with the playing force: guitars, drums, brass, strings… It ends with other details that make an instrument even more realistic.
Why one sample is not enough
Listen to the key C4 struck four times, from soft to loud (velocities 30, 60, 90 and 120):
- with a single sample, recorded at a medium dynamic,
- with four layers, the recording being chosen according to the velocity.
With a single sample, the soft notes sound like loud notes heard from far away and the loudest note lacks brilliance. The synthesizer slightly lowers the cutoff frequency of a filter for the soft notes (this is one of the default modulators), but this is far from the change of timbre of a real piano. With four layers, the timbre follows the playing force.
The difference is also obvious in a musical context, here with arpeggios getting louder and louder:
Preparing the samples
Recording the layers
Each note has to be recorded at several dynamics, for example pp (pianissimo), mp (mezzo-piano), mf (mezzo-forte) and ff (fortissimo). With 3 or 4 layers the improvement is already obvious, while the best piano libraries use 8 to 16 layers for smoother transitions. All recordings must be made in the same conditions (microphones, distance, gain): only the playing force must change.
The example of this tutorial uses 4 layers, with one sample every 3 keys over the whole range of the piano.
Importing
Name the files with the note and the dynamic, for instance C4 pp.wav, C4 mp.wav, C4 mf.wav and C4 ff.wav. When the root key is not stored in an audio file, Polyphone finds it in the file name if it contains the name of the note (C4 being the key 60) or the number of the key. The dynamic written in the name will be useful in the next step.
Import all the files with Add a sample in the toolbar, or with a drag & drop onto the tree. A stereo file gives two samples, whose names end with “L” and “R”. Then check the tuning of each sample as explained in the tutorial “How to prepare a sample”. Piano samples don't need any loop: the sound fades out naturally.
One instrument per layer
Each layer becomes an instrument containing the samples of a single dynamic. For each dynamic:
- type its name (“pp” for instance) in the search bar of the tree, so that only the samples of this layer are displayed,
- select all these samples: click on the first one and then on the last one while holding Shift,
- click on Add an instrument in the toolbar, name the instrument (“Piano pp” for instance) and keep the option Link selected samples checked.
The stereo samples are automatically panned to the left and to the right, and the key ranges are distributed over the keyboard according to the root keys (see the tool “Sample auto-positioning”). Each instrument can already be played alone with the virtual keyboard.
The parameters common to all layers can be edited at once: when the four instruments are selected in the tree, the table shows their global divisions side by side, and a value typed after selecting the four cells of a row is written in all of them. In the example, the parameter Vol env release (s) is set to 1 s so that the sound doesn't stop abruptly when a key is released.
Stacking the layers in a preset
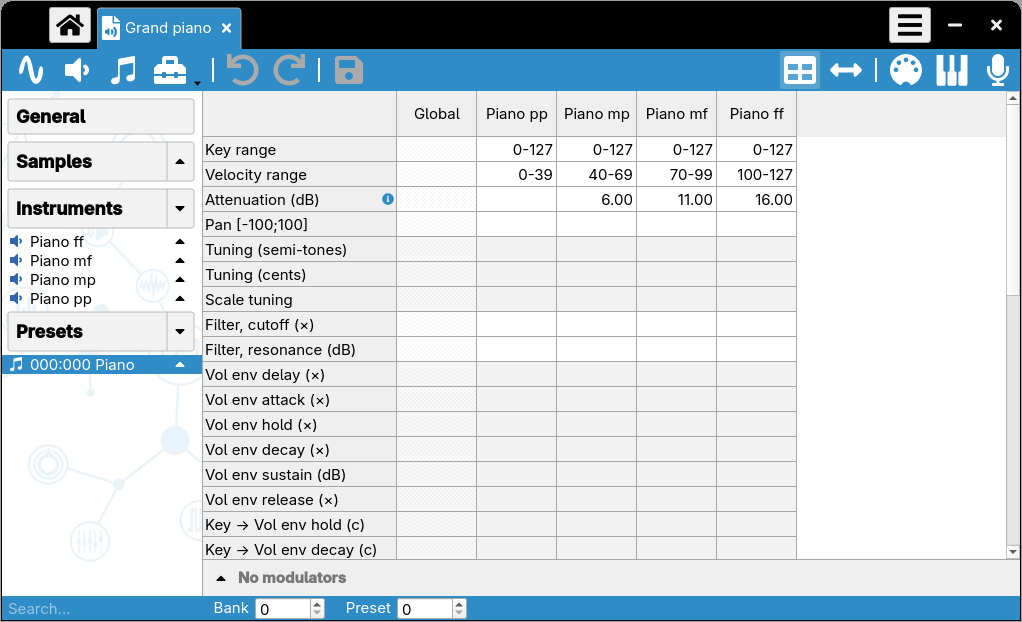
Select the four instruments in the tree and click on Add a preset, the option Link selected instruments being checked. The preset then contains four divisions, all of them covering the whole keyboard. The layers are stacked by giving each division of the preset a different Velocity range in the preset editor:
- 0-39 for the layer pp,
- 40-69 for the layer mp,
- 70-99 for the layer mf,
- 100-127 for the layer ff.
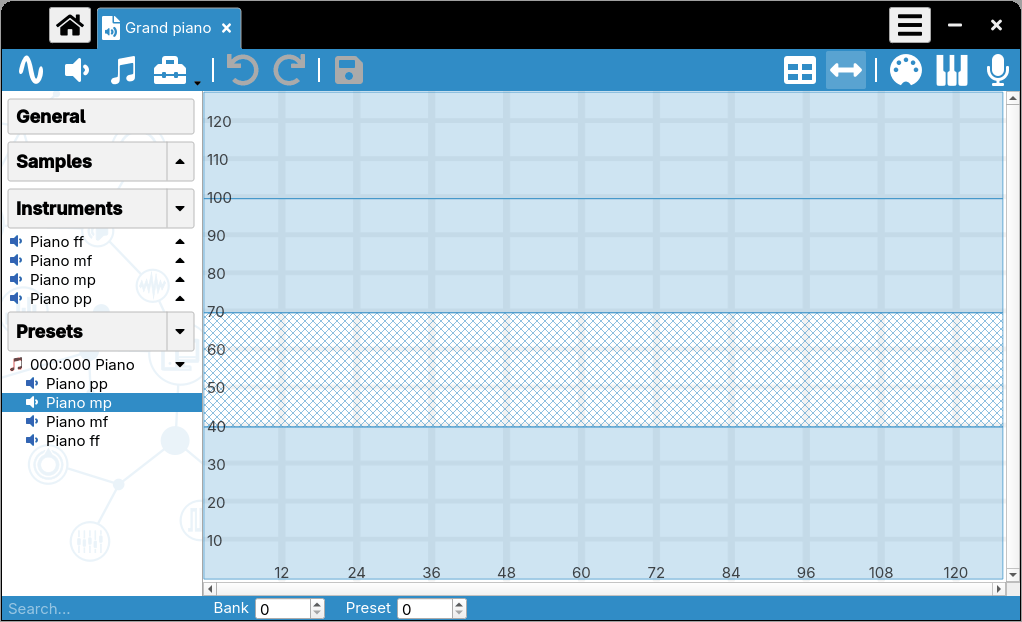
The ranges must cover all velocities from 0 to 127, without gaps (some velocities would remain silent) or overlaps (two layers would be heard at the same time). The boundaries don't have to be regular: they can be moved according to the recordings. The values of the Attenuation (dB) row are explained in the next section.
In the range editor, each layer is a horizontal band: the selected division (here mp) is hatched. This view quickly shows a gap or an overlap.
Note: the velocity ranges can also be defined in a single instrument containing all the samples, each division having its own velocity range. In this case, the choice by velocity range of the option Sort divisions in the settings keeps the divisions of a same layer together.
Balancing the layers
Within a layer, the volume already changes with the velocity: this is done by another default modulator, defined by the sf2 format. But at each boundary, the volume suddenly increases because the recordings of the upper layer are louder: about 5 to 7 dB in the example. The goal is that only the timbre changes when going from one layer to the next one, the volume increasing smoothly.
Use the virtual keyboard to compare the two sides of a boundary: the velocity of a note depends on the vertical position of the click, and the arrows ↑ and ↓ play the last key again with a velocity increased or decreased by 1. Then, for each boundary from the bottom to the top:
- play a key with the last velocity of a layer (39 for instance) and then with the first velocity of the next layer (40),
- increase the attenuation of the upper layer in the preset table until both notes have about the same volume,
- go on with the next boundary: the attenuations add up, each layer being at least as attenuated as the layer below.
In the example, the attenuations are 0, 6, 11 and 16 dB, as shown in the table above. Check several keys across the keyboard: if a register remains unbalanced, the attenuation of the divisions concerned can be refined in the instrument of the layer, for instance with the tool “Key-based configuration”.
The overall dynamic range of the instrument, from the softest to the loudest note, is then given by the default modulator. If the soft notes are too quiet or not quiet enough, this modulator can be changed with the tool “Override a default modulator”.
Finally, nothing beats a real piece of music for testing the result: play the soundfont with a MIDI keyboard or with the MIDI player (see the tutorial “Read a MIDI file with a soundfont”).
More details for more realism
Velocity layers are a big step, but a real instrument has other characteristics that a soundfont can reproduce. Here are two of them for the piano.
Release noises
When a key is released, the damper falls back onto the strings and the mechanism makes a small noise. Some sample libraries provide these noises: the one used in the example has one per key.
They are placed in a fifth instrument, “Piano release”, added to the preset over the whole velocity range:
- select the playback mode
 (release) in the Loop playback row, so that a sample is played when the key is released,
- use a long Vol env release (s) (5 s in the example) so that the noise is played entirely,
- attenuate the instrument a lot (40 dB in the example): the noise must remain discreet.
Thanks to the default modulator linking the velocity to the volume, the noise is louder when the note was struck harder.
Note: the playback mode “release” is not documented by the sf2 format and may not be supported by other players. The tutorial “Using custom releases in an instrument” describes a method that works with any player.
Strings without dampers
On a piano, the highest strings have no dampers (the last octave and a half, roughly): they keep ringing after the key is released. In each layer instrument, the divisions of these keys (from F6, key 89, in the example) are thus given a longer Vol env release (s): 3 s instead of 1 s.
Listen to short notes in the middle of the keyboard, then in the highest octave and finally a chord in the bass:
Other ideas
Other improvements are worth trying:
- recording every key instead of one key out of three: on a piano each key has its own strings, and a transposed sample is never exactly the neighboring note,
- using stereo recordings, which give width to the sound,
- computing release times that change across the keyboard with the tool “Natural release”,
- adjusting the volume or the filter by register with the tool “Key-based configuration”.
And the same approach works for other instruments: a guitar string plucked softly or hard, a snare drum between ghost notes and accents, a trumpet going from a round to a brassy sound… Each detail taken from the real instrument makes the soundfont more alive.
Polyphone is free but there are costs associated with its website and development. A small donation will help a lot.
Donatetop